


Chicken Butchery Basics
by Meredith Leigh, author of The Ethical Meat Handbook
Learning to use the whole chicken (or other bird) is one of the most foundational things you can do to support ethical meat. Why? It ensures that the farmer can profit from the entire animal, eliminates processing fees from the equation, and contributes to a better kitchen economy in the home. You’ll benefit from better prices per pound when you use the whole bird, and you’ll get more meals from a purchase.
Below you’ll find basic a chicken butchery technique, excerpted from The Ethical Meat Handbook: A Complete Guide to Home Butchery, Charcuterie, and Cooking for the Conscious Omnivore. These simple cuts will boost your ability to work with the whole bird for any recipe – from roasting to frying, braising or smoking. For recipes, and more butchery techniques, such as de-boning, visit ethicalmeatbook.com to purchase The Ethical Meat Handbook.
How to Butcher a Chicken
Chicken is a great place to hone your cutting skills. We’ll cover the standard, eight-piece cut, and offer a slight variation, which will come in handy when you’re frying chicken.
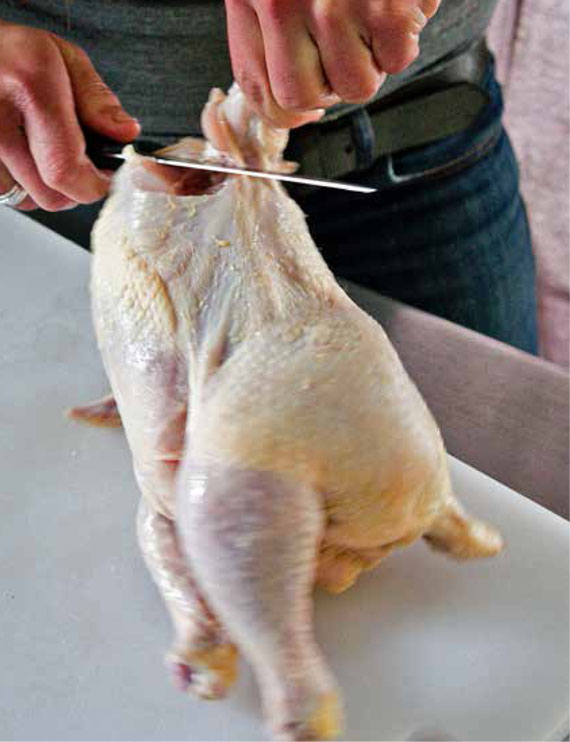
Begin by removing the wings. Stretch the wing as far as you can and move the joint up and down to find the socket. Using a semi-flexible boning knife, cut the wing off at the shoulder, aiming for the space between the ball in the arm bone and the socket in the shoulder.

Pull on the wing to discover the joint, and remove.
Variation/Confession: I’m not big on the stand-alone chicken wing, so I like to cut the wing off with a bit of breast meat to accompany. To do this, simply angle your knife at about 45 degrees from the wishbone and cut off part of the breast as you remove the wing.

To remove some breast meat with the wing, cut at a 45-degree angle, downward from the wishbone, and then remove at the shoulder bone, as if you were removing the wing only.
Next, free the oysters. This will assist you in pulling the legs off intact. The oysters are the small, round, tender pieces of dark meat located on the chicken’s back, one on either side of the spine. You’ll find them right at the spot where the legs join the body, and this is where you’ll make the first cut, across the back.
You’ll see the oysters on either side of the spine. Use your boning knife to make small cuts close to the bone, undercutting the oysters and scooping them free. Leave them attached to the skin.

Cut across the back to access the oysters.

Freeing the oysters.
Now, flip the chicken back over so it is breast up, so you can remove the legs. Stretch each leg out at the hip and cut through the skin until you see meat.

Cut through the skin between the breast muscle and the leg to access the leg joint.
Find the hip joint by gently wiggling the thigh to and fro, following accordingly with your knife. Pull back on the entire leg, peeling it away from the breast. You’ll eventually pull the hip out of joint, after which you can follow through to remove the oysters along with the entire leg.

Pull back on the leg to dislocate the hip. Then, you can easily complete the cut through the skin to remove the leg with the oyster attached.
Next, divide the drumstick from the thigh. First, identify the seam of fat at the joint, and begin your cut there. Once you’ve cut into the meat, you’ll be able to see the joint clearly, and cut directly between the bones for a clean break.

Separating the thigh from the drumstick.
The next step is to remove the backbone. You can use poultry shears for this if you’re nervous, but it’s not that tough to do with your boning knife. Just come at the spine at about a 45-degree angle, making close, downward cuts parallel to the spine. If your knife gets too vertical, you’ll run into resistance, so as long as you keep that nice, slight angle, you’ll be fine.

Keep your knife at an angle to remove the backbone.
Finally, split the breast. In between the two breast pieces is the sternum, or breast plate. I make straight cuts down either side of the keel in the breastbone and then start pulling the breast meat off of it with my hands, running fingers under the meat and close to the bone. Once you’ve exposed enough of the bone that you feel like you can pull it out, do it.
You’ll be left with breast meat that has ribs attached. You can remove the ribs by hand if you like, or use your boning knife to separate them from the back of the breast muscles.

After making straight cuts along either side of the keel bone, begin pulling the breast muscles away from the bone, using your hands.
About the author:
Over the past 15 years, Meredith Leigh worked as a farmer, butcher, chef, teacher, non-profit executive director, and writer, all in pursuit of sustainable food. She has developed a farmer co-op, founded and catalyzed non-profit ventures, grown vegetables, flowers, and meats, owned and managed a retail butcher shop, and more. She’s a single mom, and, the author of The Ethical Meat Handbook: A Complete Guide to Home Butchery, Charcuterie, and Cooking for the Conscious Omnivore. Says Meredith, “Above all, I am committed to real, good food, as a means to connect with people, animals, and plants, learn new skills, create intentionally, stay inspired, and experience deliciousness.”