


by Joe Rowland, CFSA Organic Initiatives Coordinator
There are so many factors to manage in the greenhouse. From light, heat, water, nutrition, and soil, the list is exhaustive and, at times, overwhelming. A lot rides on good quality transplants, and learning to produce them consistently takes time and patience. This article will help you identify key areas and avoid common mistakes.
Below, I’ll cover potting soil, nutrition, tray types and sizes, planting seeds and filling flats, timing, irrigation, as well as heat and light.
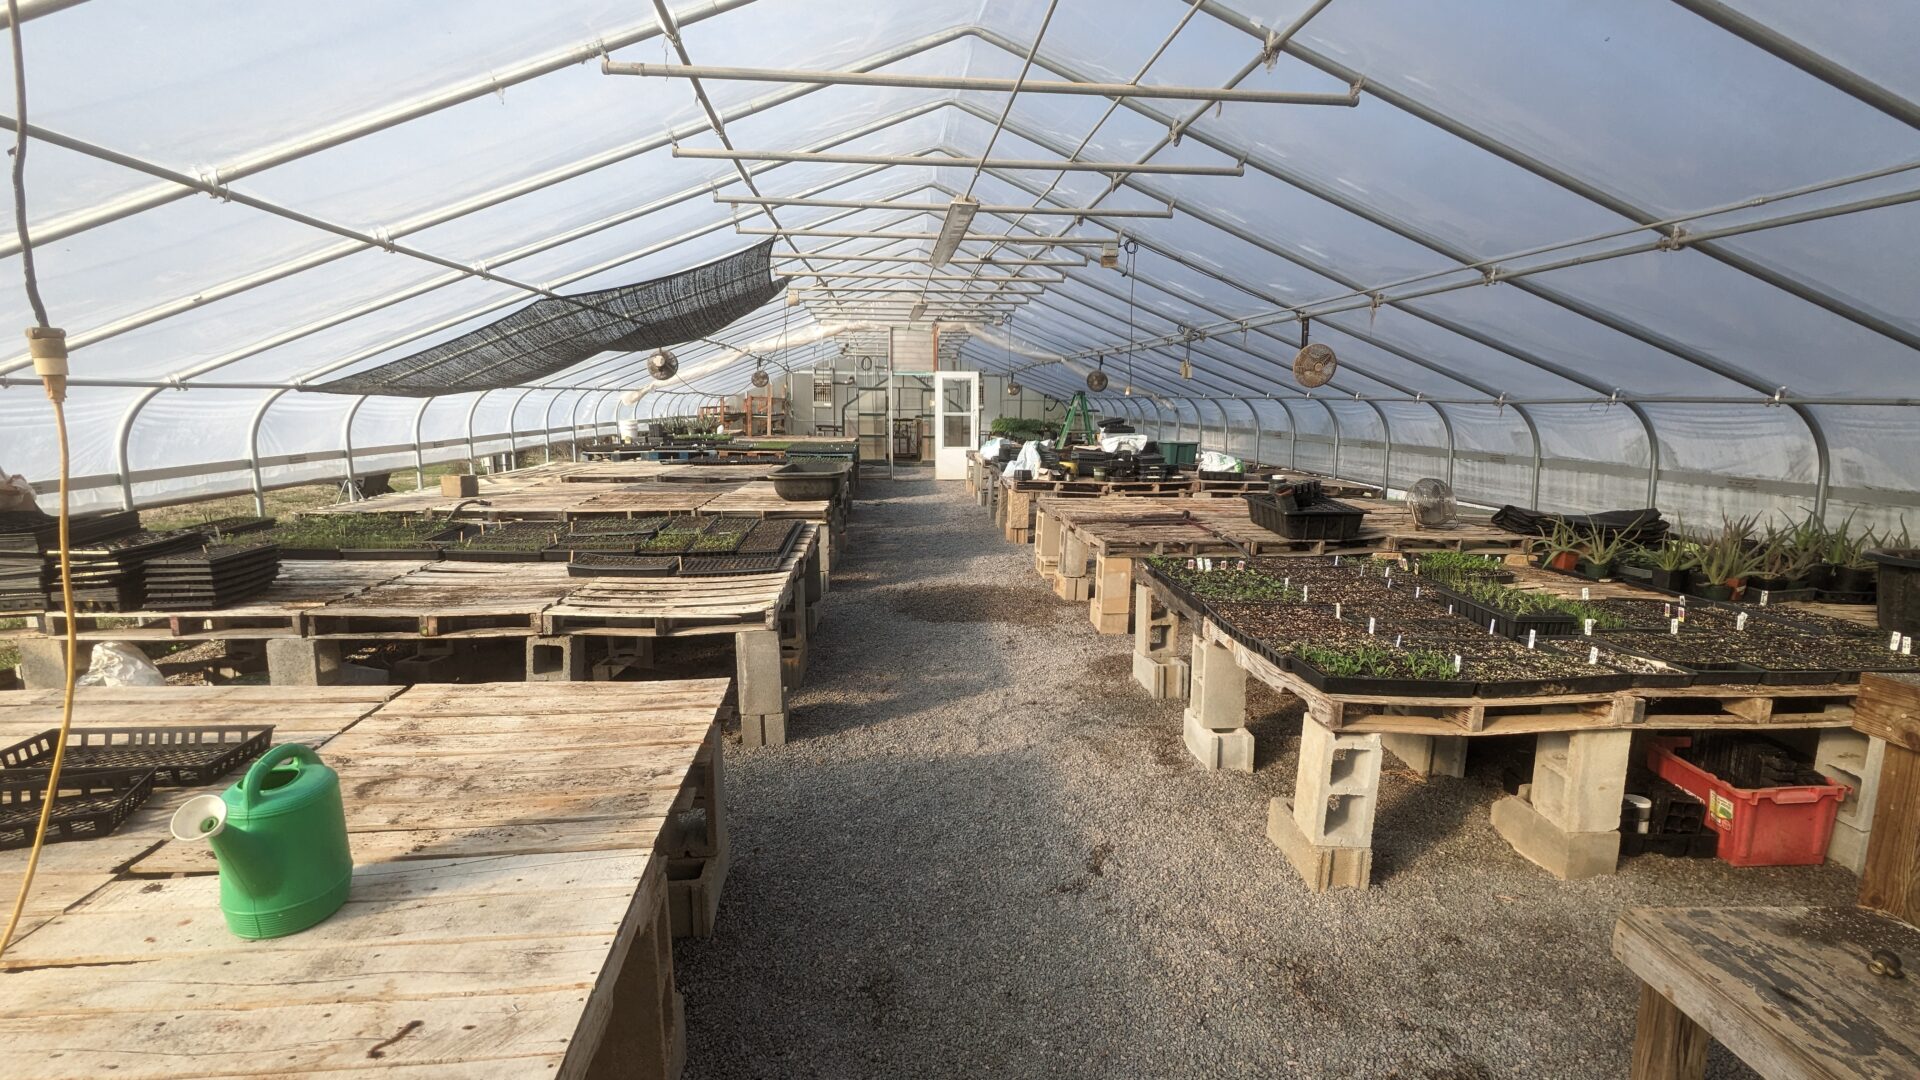
Potting Soil
The backbone of successful transplant production is potting mix, potting soil, growing media–medium, call it what you will–and is a great place to focus attention. It is very hard to provide everything a plant needs for 4-8 weeks in the confinement of a small plastic tray. I started mixing my own from different ingredients like peat moss, perlite, vermiculite, compost, lime, etc.
This can be time-consuming and result in a variable product. I’ve had disease issues based on contaminated ingredients, nutrient deficiencies, and poor drainage. All the problems you don’t want in a potting mix. Purchasing a bagged or pre-made mix can be a good option, or buying in bulk-sized totes or sling bags to reduce plastic waste is also great. But, understand the core ingredients, peat moss, perlite, coconut coir, compost, fertility (or lack thereof), and any chemical additives and wetting agents. These can cause problems, specifically with certifiers if certified organic.
Ultimately, where I have landed for many years now is buying top-quality compost-based potting soil, like Vermont Compost or McEnroe’s. They are expensive and need to be shipped in from out of state, but the quality and results I have seen are top-notch. There are many other good quality mixes, and I recommend trying a few side by side to see what you like to work with and what grows best in your system. Melinda and Country Farm and Home in Pittsboro, carry many great choices!
Nutrition
Nutrition is critical in these mixes. It is difficult to sustain optimal plant growth over an extended greenhouse season while watering and leaching nutrients through the trays constantly. As I said, early on in my career, I tried to mix my own complete nutrition into the homemade mix, with poor and variable results. I did not have consistent quality across the tray, with gaps and areas that grew poorly compared to others.
A complete, pelletized, composted poultry product can be used successfully in the greenhouse. I have seen it done and have done it myself. Some growers grind the pellets finer to incorporate for seed starting, others leave them as pellets and incorporate it when larger plants are potted up. Liquid products like fish emulsions and other things can be used exclusively and as a top dress. My greenhouse fertility of choice is equal parts blood meal and feather meal. Though I have heard conflicting research lately, it was originally thought that blood meal was more water-soluble and, therefore, faster acting than feather meal. I developed my fertility based on that assumption. Blood meal is available to the plant immediately upon germination, providing nutrition as needed for strong, fat, dark green cotyledons.
Some of these may be variety-specific, but getting young plants off to a good, fast start is recommended. The feather meal, on the other hand, releases slowly over time, ensuring that there is adequate nutrition throughout the crops time in the greenhouse. Some products have both blood and feather meal and other things in them, but many are pelletized. I use the two separately because I like the fine grind and ease of even distribution and incorporation into the mix. Make sure you understand what fertility is already in your mix before adding more. Young plants are easily susceptible to fertilizer burning.
Whatever you do, make sure to do something. The early life of these plants sets the stage for how they will produce once in the field. Stunting, stalling, slowing down, or allowing plants to become leggy and root-bound can never be overcome in some cases and lead to significant reductions in yields and increased pest and disease pressure. Every job you do afterward can be made easier by learning to manage plants in the greenhouse properly.


Tray Types and Sizes
There are many types and sizes of trays for the greenhouse. Most are based on a 1020 style, which is a rough measurement of the length and width of the trays. Plastic web trays with flimsy inserts, harder plastic that doesn’t require a bottom/web tray, or rigid plastic such as the winstrip styles are all adequate. Some growers use larger styrofoam trays. These can be used in float bed systems. Oh, and don’t forget soil blocks, which are freestanding, formed soil cubes. Tray size compatibility with mechanical transplanters is an important consideration. I hesitate to go too far down the rabbit hole of what crops to put in what sizes because each grower has their own ideas about such things. But I’ll share some of what I do for reference and discuss a few different tray sizes. Understand that proper tray sizing for a corresponding crop affects a lot of factors. Cost, amount of soil used, amount of greenhouse space needed, how long plants can stay in trays, the overall plant structure, how quickly they dry out or need water, and many more.
Typically, the numbers–36, 50, 72, 128, 200–refer to how many plants fit into that tray, usually within the dimensions of the 1020 we discussed previously. So a 36 holds 36 plants in a 10 x 20 space, while a 72 holds 72 plants in that same space. Therefore, the cells are smaller in the 72 and larger in the 36. So, a 200-tray tray has very tiny cells. (Cells are the space for each individual plant within a tray.) Cells can be tapered to a triangular point on the bottom or flat and square. The triangular bottoms may sometimes allow plants to pull from the trays more easily.
I have tried them all over the years and have found that for my system, I only really use 36, 72, and 128’s. I use some open, web/bottom trays for certain crops like tomatoes, peppers, and eggplants that I will prick out and pot up soon after they have true leaves. For everything else, I’m going directly into 36, 72, 128. After years of trial and error and perfecting my fertility and production plan, I strive never to pot anything up except the Solanaceae crops that I just mentioned above. This means that once I plant a seed in the tray, it can stay in that tray until it goes into its final resting place in the field. This reduces greenhouse labor, material costs and reduces greenhouse space. Sometimes, I am forced to hold plants longer than their tray size allows. In these cases, I will either pot up the plants, give them additional fertility, overwater slightly to try and inhibit respiration and slow growth a bit or some combination of all of these. This depends on the crop and how long I need to hold them.
In general: Most of my early, cool season crops, i.e., brassicas, lettuce, spinach, are in 72 trays. I break this rule and use 128s sometimes when space or soil is limited. Cucurbits, including melons, cukes, and winter/summer squash, are in 36 trays. Solanaceae are potted up from open web trays into 36 trays. 128s are reserved for small crops or anything I know I can get out of that tray on time, especially when space in the greenhouse is limited. Scallions, kohlrabi, pac choi, cilantro, and dill are some crops I will put into a 128.
This is what works for me and has been developed over the years. Many experienced growers may read this and disagree or think my tactics are unnecessary, risky, or wasteful, just as I am surprised by what I see other growers do in this area as well. But find what works for you and embrace it. What I believe and have observed to be optimal for plant health is always my guiding principle in this realm.
When in doubt, go with the larger tray size. This may be more costly and even borderline wasteful at times, but it should not negatively affect the quality of the transplant. Healthy plants and strong yields will hopefully overshadow minimal increases in soil costs. It may affect when a plant is ready to go outside, as you typically have to wait for the roots to fill the cell before they are easily removed. You can get away with a smaller cell size if all the other factors of light, fertility, moisture, timing, etc., are dialed in. This applies especially to spring, when cool, wet soil may cause you to hold things in suspended animation longer than you’d like.
Growing larger seeded, vigorous, fast-growing plants like tomatoes, squash, and cucumbers in a smaller tray leads to competition for light, legginess, and possible issues in the field. Squash, for example, is ready to transplant in a 36 ct tray in about three weeks for me without getting leggy or overgrown. I have seen squash in smaller trays ready in two weeks or less but beginning to stretch at that point. This may not matter, and plants often recover or perform normally if conditions are good once they get to the field, but it’s not preferable, in my opinion, and I believe the stress response can lead to more pest and disease pressure upon transplanting.
Planting Seeds & Filling Flats
You wouldn’t think so, but something as simple as filling a flat/tray with soil can be done improperly. When your potting mix is ready to be loaded into trays for seeding, it is often heaped into the center of the tray and then spread across the surface, filling the individual cells with soil. The action of heaping soil into the middle of the tray packs that portion of the tray more than the outer edges. More soil, packed tightly, means it often holds more water than the sides, and you end up with a tray that retains moisture unevenly. Less soil at the edges of the tray will dry out quickly and underperform.
Having something below your tray that captures spilled soil allows you to heap soil across the entire tray’s surface, evenly scrape all excess off, and reuse it. Soil should be moist but not wet during this process. Once filled, trays should be tamped until the soil is slightly below the lip of the tray. Don’t overdo this and compact the soil too aggressively.
There are dibblers, dibble boards, and other tools that make a small indention in the soil surface to receive the seed. I have found that using an empty tray makes a fine depression across the entire tray with gentle, even pressure.
If you are seeding lots of seeds continuously, a vacuum seeder is helpful. It can seed an entire tray in seconds and reduce your labor dramatically. Once the seeds are in the cells, they need to be covered. Unless they need light to germinate, like lettuce and many herbs. Many people use vermiculite to cover seeds; it is fine, light, retains moisture, and doesn’t crust in hot and sunny conditions. I use the same potting mix I seed into, only a fine sprinkling over the top of a seeded tray. This helps with seed-to-soil contact, germination, and keeps seeds from washing away if irrigation is too intense. Finished flats/trays should be watered and placed in a location with sufficient heat and light for that crop.


Timing
Thinking about what tray to put things in directly correlates to when they will be ready to go out. A plant is ready to be moved to another, larger pot or, ideally, into the field when it easily pulls from the cell in the tray with gentle, constant pressure applied to the base of the stem at soil level. If the plants come out by ripping the roots in half, ripping away from the roots, or coming out with the roots but no soil attached, then they aren’t ready, OR conditions aren’t right…too dry or too wet. This is tricky. It depends on moisture, as stated, on tray type, i.e., plastic, styrofoam, on plant maturity and root development. So much to manage!
In a pinch, you know those drainage holes under each cell? A pencil, pen, stick, or bolt will slip right in there and help urge those stubborn roots to release. It’s tedious, but especially with mechanical transplanters, you need those plants to pop easily and quickly. Many growers, myself included, will often pre-pop the entire tray. This can be done by gently pulling each plant as described before or punching or dibbling each cell from the bottom. Dibble boards, similar to the ones referenced earlier, can be created that will simultaneously push through the drain holes of each cell by lining them up and pushing the tray down onto the board. This loosens all plants in the tray at once! Much faster.
Timing depends on so many management habits and environmental factors. How long will those plants need to stay in the greenhouse before being ready to go outside? Depends. Do they have adequate fertility? Do they consistently get over or under-watered? What size tray are they in? Has it been sunny and warm or cloudy and rainy lately?
I would much rather put a smaller, healthy transplant in the field that has not been stunted or set back during its young life instead of a huge, overgrown plant. Maybe counterintuitive, but that smaller plant will often overtake the larger plant and produce better. It reminds me of the concept of seeding sparsely, giving space and room, and limiting competition to get more yield instead of packing the seeds in tightly and expecting to get more product because you planted more seeds. It just doesn’t work that way.
Over the years, I have decreased the greenhouse period for many crops. I’d rather manage a crop in the greenhouse for as little time as possible. Only long enough to get the maturity that can survive and thrive on the outside.
In general: Most of my early, cool-season crops, i.e., brassicas, lettuce, and spinach, are planted 4-5 weeks before the target transplanting date. Cucurbits, including melons, cukes, and winter/summer squash, are 21 days before target planting. Solanaceae are about 6-8 weeks before outside planting.
Irrigation
Watering is maybe the most critical step in the greenhouse process. Have I said that about everything so far? It feels like it, but it’s true. The greenhouse is where it all starts, so each step is important. There are two types of people in this world. Those that over water and those that under water. I tend to over-water and have to make it a point to let things dry out sometimes. Learning how trays feel and how heavy they are when fully watered is a good skill to learn.
For a number of reasons, watering should not be the last thing you do before going home. Plants are more prone to disease when the leaf surface remains moist overnight. Watering early in the day to allow adequate time for the sun/heat of the day to dry leaves is the best practice.
Watering should be done evenly, thoroughly, and consistently, taking the weather into consideration. This takes time. I will water the entire greenhouse in a methodical fashion. Paying close attention to making even passes over the tray. For all the same reasons as discussed when filling the outside edges of trays with soil, I water past the end of the tray to ensure adequate water makes it into those outside cells. Use a quality spray nozzle with a broad, gentle stream. Dramm Redhead is a brand of water breaker with 1,000 micro holes that creates a beautiful spray for fine-seeded crops.
Once I have watered everything, I usually start back over at the beginning and water a second time in the same manner. Water until you see it dripping from the drain holes. Two even passes usually does it for me. Now, importantly, let things dry out before repeating this process again. This is hard to learn at first, but it is better to water less frequently but more thoroughly than adding a little bit of water everyday/all the time. Roots need oxygen for respiration, which affects all the cells in the plant. Overwatering can lead to dead, rotting roots, stunted growth, and wilting, limp leaves. Underwatering leads to wilting, drying, cracking, brown, dying leaves. The key is to be somewhere in the middle! Often overlooked, your supposed nutritional deficiencies in the greenhouse, especially early in the season, may simply be because of improper watering.
Sprinklers/misters and timers exist that can aid in this area. But, I prefer to hand water and use mechanization as a fail safe only for those days that I’m away from the farm for longer periods or when I can’t spend as much time in the greenhouse as I’d like. Watering is a time to notice things about your seedlings, coloring, stature, pests, germination rates, etc. You should see growth in young plants. Sometimes slow at first, but if plants sit in one stage of maturity for days and weeks, something usually is off. Check fertility, moisture, and light/heat levels.

Heat and Light
Speaking of heat and light, heat mats and grow lights can be great and necessary…and I rarely use them! If growing things indoors or over winter, lights may be necessary. Some crops, like lettuce, require light to germinate (but not necessarily artificial light.) Microgreen growers will often utilize lights in their germination chambers. Otherwise, a bright greenhouse space with clean plastic and no obstructions should be adequate.
Heat can be helpful as well. I use heat mats for most of my warm-season crops where space allows. Tomatoes, peppers, eggplant, basil, and sometimes squash, although my squash plantings usually germinate well without heat. These all can do well with bottom heat. It can help hasten germination with early-season brassicas and many other things. But, too much fertility, bottom heat, reduced ventilation, and poor lighting is a recipe for leggy, spindly, struggling seedlings. This environment is susceptible to a fungal disease called damping off, which rots seedlings as they emerge. So, where heat is warranted or desired, use it sparingly. Remove trays from mats as they begin to germinate, not leaving them for multiple days after germination.
Germination chambers can be used to keep a smaller environment warm and moist economically. This can be done in many ways. There are expensive commercial units available. You can find plans available to convert a fridge or freezer to a germination chamber as well. At the Lomax farm, we have a small greenhouse inside the greenhouse, which serves this purpose. We have ventilation fans and thermostats installed, as this inner sanctum can get extremely hot. I have made a germination chamber by creating a low tunnel of greenhouse plastic over tables with heat mats and a space heater running underneath. This is an area to explore but not something to stress too much about. Numerous other growers and I germinate thousands of plants without a chamber. Again, a well-lit and properly managed greenhouse and some heat mats for specific crops can do the trick nicely.
Now, these little babies are growing well. The germination was good, the color is dark green, and they are growing quickly and developing true leaves. You are potting up as needed and preparing them for life outside. At this stage, thin all cells to one plant by snipping or pinching any additional plants germinating in the same cell. This step is best done earlier than later, as it is harder to remove additional plants without damaging the roots of the “keeper” later on.
Finally, hardening off is a process of acclimatizing young plants to the perils of outdoor living. After all this time in a warm, protected greenhouse, the wind, direct sunlight, pests, and changes in soil and fertility can be detrimental and “shocking.” To properly harden transplants, you can begin to expose them to outside temperatures or reduce irrigation water. I prefer to expose them to outside temperatures when feasible. Reductions in irrigation and/or fertility can have larger, negative effects in some instances and should be done with caution and understanding. It’s worth mentioning that restricting water or nutrition is not the way to go about this when needing to “hold” a plant inside longer than anticipated. Actually, plants should be fertilized and potted up, if possible, to feed them during their layover.
Plant Some Seeds!
Well, we did it! We grew all these wonderful plants, and now we just have to get them all out in the field, keep the bugs and disease off them, control the weeds around them, get them harvested, washed, and packed, and then sell them for a profit to pay ourselves to do it all again next year. Nothing to it, right? Let’s do it.
Reach out if CFSA can be of any assistance.
About the Author
Joe Rowland is CFSA’s Organic Initiatives Coordinator.
Joe has called the Piedmont of North Carolina home for over 35 years. His farming passion comes from summers spent on his grandparents’ farm in Indiana. Driving tractors, feeding cows, bailing hay, helping his grandmother in the garden, and fishing in the afternoons cemented that farming was the path for him.
After years in the craft beer scene in Boston reignited his interest in the integrity and artistry of artisanal products, Joe returned to North Carolina to focus on growing food. He spent four years as a farmer in training at the Elma C. Lomax Incubator Farm (now Elma C. Lomax Research and Education Farm). He purchased an 18-acre homeplace in 2012 and operated a sustainable, formerly organic-certified fruit and vegetable farm. Joe has also managed multiple farms in that area.